
|
Welcome to this detailed article on how to play multiplayer Doom via TCP/IP wirelessly (and/or wired) on a DOS laptop. Networked games in Doom usually use NetWare, but I had issues with this so looked for an alternative. This alternative also allows deathmatch over the Internet.
The traditional Doom multiplayer experience involves chunky PC desktops or towers with CRTs and speakers. But what if we could do the same wirelessly, using old laptops? The great thing about laptops is that they have a much smaller footprint, especially if they have built-in audio, and some still run on their original batteries (both my Toshibas do).
Doom over Wi-Fi has definitely been done before. I'm pretty sure it's possible to play multiplayer Doom wirelessly using modern hardware and emulation, but this article is not about that. It's about how to achieve the same on original hardware: older laptops based on the 486 and Pentium family. The target audience of this article is someone who has one or more PCMCIA-equipped laptops (and Ethernet-equipped desktop/laptop computers, optionally) that you want to play multiplayer Doom on. There are projects on how to bridge Ethernet to Wi-Fi on a PC of any age, for example, but this particular article is about minimising the hardware involved so that it's truly portable and as era-correct as possible.
Contents:
1. Introduction
Sorry to start with a disclaimer, but this is the Internet, so...
DISCLAIMER: this project has emphasis on 'fun' rather than accuracy. I have spent many hours consulting various sources to ensure that the information enclosed here is correct. Where I'm not sure of something, I have made this clear. This whole process is currently experimental and work-in-progress and the more people that get involved and test it out, the more successful and accurate it will become. I make few guarantees and hope that, by reading this article and having a go, you accept the risks (and enjoyment) of potentially getting things wrong and maybe wasting a bit of money on buying stuff that doesn't work, for example. It happens in this hobby. These kind of situations are great opportunities to learn and pass on information and that's the spirit of this article. If you do find out something that contradicts what I've stated here, or adds to it, please let me know. Thanks!
Also, in order to keep this article relevant, I make some quite big assumptions that you have a good working knowledge of DOS on the PC, such as how to copy files, run programs, how memory allocation works and how to edit startup files, because that's too much to explain here and there's plenty of info elsewhere. There is not an abundance of info on Wi-Fi under DOS, so I'd like to stick to that. I also mostly assume that you have worked with wireless networks, wired networks and PCs before in some way and understand terms like 802.11b, IP address, subnet, WEP, PCMCIA, access point, hexadecimal, Ethernet, ISA, PCI, ISO, conventional memory, etc. so if you don't understand something, that's another opportunity for you to research stuff. (I do also partially explain some of these things anyway because I'm me.)
Note: all the links in this article work at the time of publication (Oct '22). If you find that a link doesn't work, it's possible the site or page was taken down. You can try locating an old version via The Wayback Machine at the Internet Archive by simply pasting the link in there.
2. TL;DR
Although this article attempts to cover one small subject, it has ended up being... quite long. Over 5,000 words, in fact. As such I've composed this 'too long; didn't read' section for advanced users who just want the gist of what to do so they can get on with it. It assumes that you already have Ethernet cards installed in your desktop PCs, at least one laptop with PCMCIA, and DOS 6.x plus Doom (same version, 1.2 or above) on all computers involved. Here are the steps in basic terms:
- Setup an 802.11b network using an appropriate wireless access point or gateway.
- Acquire a Lucent Orinoco compatible PC Card (one for each PC to be connected).
- Download the ISO containing the drivers and install the Card Access Driver (WVLANCAD.SYS) according to the manual and install it.
- Configure the packet driver by editing PACKET.INI and setting the network name and station name.
- Run the Orinoco packet driver with the command WVLAN42.COM /L and do the same for whatever packet driver your Ethernet card uses.
- Optional: Install, configure (static IP is best) and use mTCP's PING utility to test your connection.
- Copy Kali 1.2 onto each computer (Ultimate Doom should already be installed).
- Configure Kali by editing KALI.CFG and by adding your IP address and such to WATTCP.CFG.
- Run Kali and play multiplayer Doom!
3. Early Wireless Networking
Welcome to the main article! A bit of history and context is necessary before we get into it. In the era of Doom (let's call it the mid-1990s) it was rare for a laptop computer to have networking hardware built-in. It was more common for a modem to be included, but laptops of this era almost exclusively used expansions in the form of the PC Card. I won't say much about this (read more here) other than that it was a standard, introduced in June 1990 by the PCMCIA, designed to add functionality to laptop computers, including video grabbers, audio, SCSI, FireWire, networking, etc. Yes, PCMCIA is the organisation and PC Card is the product. See it as an ISA bus for laptops (later the CardBus standard was introduced, which was equivalent to PCI).
There were few wireless network products available at the time and there was no standard established for this, so competing products were incompatible. One such example was WaveLAN by Lucent (formerly NCR and AT&T), which is now very rare. No doubt people were playing Doom (and other games) over Novell-based networks in the mid-'90s, but any documentation that existed then would be hard to find and would lack general relevance. This is because the technology was standardised in 1997 and called 802.11. Lucent's new product adopted the name WaveLAN IEEE, which was incompatible with previous generations.
4. Wireless Networking in DOS
Given how well established Lucent's technology was, Apple decided to adopt it for their AirPort product in 1999, when the 802.11b standard was introduced. This was the first widely-adopted consumer Wi-Fi product and led many other members of the tech industry to do the same and introduce products based on Lucent's. The problem with all this is that DOS wasn't a particularly commonplace OS in 1999, and even less so in 2001 when Wi-Fi really became widespread, so manufacturers just didn't bother to make drivers for it. I have a number of 802.11b cards that only support Windows 95 and up. In fact the WaveLAN IEEE cards (later renamed Orinoco) are the only ones that have proper DOS support. Actually that might not be entirely true - I've read, and heard anecdotally, that Cisco Aironet cards also work in DOS, but I've not worked with these at all so cannot say with any confidence that they do. Maybe someday I'll be able to write a guide on this, too.
The only thing that made this entire project possible was that the drivers and documentation for the WaveLAN cards is so damn good and easy to locate. This is the manual I consulted in the process of writing this guide, if you're technically-minded or just curious.
5. Acquiring Hardware
Before you go any further, you're going to need these two things:
1. A wireless access point / router / base station capable of creating an 802.11b network
It's quite possible that the wireless-capable router you have in your home right now is capable of 802.11b networking. One modern router I owned until recently (by Virgin Media) had a 'guest network' feature capable of 802.11b. You only need to consult the documentation of your particular router or flick through the configuration screens to find out if it can do what you need.
The alternative is to get an original wireless access point or ADSL router from about 20 years ago. I don't have any advice on acquiring a suitable base station really, but one from a better-known manufacturer such as 3Com, Buffalo, Linksys, 2Wire, D-Link, DrayTek or Netgear may make things easier - they could usually be configured via a web interface and it will be easier to get the documentation online. Either way, there's a high chance you'll have to consult the manual for whatever you acquire, because that will tell you how to perform a factory reset and how to log in to configure it.
Security note: if you're new to this, one thing to bear in mind is that 802.11b uses an encryption method called WEP, which is fundamentally broken. This means that it's insecure, so you need to make your own decisions about what this means for your own network. If your access point is only going to be used to connect a DOS laptop to another DOS laptop then you don't need to connect it to anything else at all and it pretty much eliminates any risk. If you did want to connect it to desktop PCs, an easy way to manage this would be to have a completely separate network for your old PCs. Bear in mind that the type of 'guest network' I mentioned above on newer routers usually isolates wireless clients from the rest of the network for this reason, so while you can get Internet access, you won't be able to send network traffic between wired and wireless computers with this method.
2. A Lucent WaveLAN compatible PC Card
Although there are hundreds of thousands of these things in the world, many have been recycled, some of them will still be in active service and some of them are knocking about in someone's drawer of old crap. As a result, you will likely have to hunt one down. You will also need one for each computer you want to network wirelessly but they don't need to 'match' in terms of their model or brand, just their compatibility. eBay is unfortunately going to be the most successful way to do this, certainly if you're in the UK. You might also have luck with any other second-hand selling platform in your country or territory. They are beginning to become scarce, but I recently purchased one for £9.99 so this isn't going to cost you an arm and a leg. Some people are trying to sell them for £50, though.
Luckily there were hundreds of clones made of the Lucent Orinoco card. If you want to maximise the chances of you finding a compatible card, I have found an extensive list of products that use the Orinoco chipset for you to browse and consider. There may well be more, but this is the information that exists at the moment and, even then, the only way to know for sure would be to install one in a PC and see if it works. Generally speaking they all look the same physically, so that's a massive clue when you're hunting.

|
| A Lucent WaveLAN Silver IEEE 802.11b PC Card |

|
| A Dell TrueMobile 1150 Series PC Card. Note the position of the Status and Activity LEDs and how they are in the same position as those on the Lucent card. This is your 'tell' |
The only cards I can 100% guarantee will work so far (because I've used them in real life) have a * next to them, but listed below are some of the more common models that you are likely to come across and which, based on photos and documentation, I'm pretty certain are Orinoco clones:
- *Lucent WaveLAN IEEE (silver / gold)
- *Lucent / Agere / Avaya Orinoco (silver / gold)
- *Avaya World Card (silver / gold)
- *Dell Truemobile 1150 (model PC24E-H-FC)
- *Enterasys RoamAbout 802 (models CSIWS and CSIBD )
- *Compaq WL110 / WL210 / WL215
- ELSA AirLancer MC-11
- Buffalo AirConnect WLI-PCM-L11
- Sony PCWA-C100
- IBM High Rate Wireless LAN PC Card (model 09N9863)
- Toshiba Wireless LAN PC Card (model PA3064U-1PCC)
Also might be, but I can't verify because I can't find photos and/or documentation:
- HP 150WL
- Intel Pro/Wireless 2011
Some of these cards were also built-in to the access points themselves so you could salvage one that way. For example, the original AirPort base station has a genuine WaveLAN PC Card in it. Weirdly, although the AirPort card itself uses the Orinoco chipset, it's not PCMCIA compliant - it just looks like it - which is why it's not on the list. Here are access points that I'm pretty certain have an Orinoco card in them, again based on careful research:
- Apple AirPort Base Station (Graphite) (manual)
- Lucent RG-1000 (manual)
- Lucent AP-500, AP-1000 and Orinoco WavePoint-II (multiple external cards)
- Enterasys RoamAbout Access Point 2000 (model CSIWS) (manual) (card is external)
- Compaq WL310 Gateway
- Buffalo AirStation WLAR-L11
- Elsa LANCOM Wireless IL-11
And these maybe but I can't verify because of lack of documentation:
- Dell RG1000
- Buffalo AirStation WLA-L11
- IBM Access Point Model 9085
The other option you may wish to pursue is making a desktop PC wireless. As far as I know, Lucent did not manufacturer an 802.11b-compliant ISA or PCI card itself. Instead they used a PC Card bridge (an ISA or PCI card that a PC Card can plug into) so, if you want to have a wirelessly-networked desktop computer, you're going to need one of these. As far as I can tell these are generic and should 'just work', but we all know how hardware manufacturers like to be dicks and lock down their products. Proceed at your own risk. I've never installed one of these so I can't help, unfortunately. Documentation for the product will be your best bet for such an option.

|
| ISA-to-PCMCIA card bridge |
6. Getting Started
Once you've acquire these bits of kit, we can get going. This is the hardware I used on this project:
- Toshiba Tecra 740CDT
- Pentium MMX 166MHz
- 16MB EDO RAM
- 13.3 Active Matrix TFT Display
- 2x PCMCIA slots
- CT65554 graphics chip
- 2GB hard drive
- Floppy drive and external CD-ROM (swappable)
- Modem, serial, parallel, PS/2, IR, VGA
- Crystal CS4232 audio, SB Pro compatible
- Lucent Orinoco Silver WiFi PC Card
- Toshiba Satellite 320CDT
- Pentium MMX 233MHz
- 64MB EDO RAM
- 12.1" Active Matrix TFT Display
- 2x PCMCIA slots
- CT65555 graphics chip with 2MB EDO RAM
- 4.1GB hard drive
- Built-in floppy drive and CD-ROM
- Serial, parallel, PS/2, IR, VGA
- Yamaha OPL3-SA3 audio, SB Pro and WSS compatible
- Compaq WL110 WiFi PC Card
- Desktop PC
- AMD 5x86 160MHz
- 64MB EDO RAM
- 15" EIZO SVGA CRT monitor
- S3 Virge/GX 4MB
- 2GB hard drive
- Miro Miroconnect 34 Wave (IBM MWave) SB Pro and GM compatible
- 3Com Etherlink III (3C509) network card
- Apple AirPort Base Station (Graphite)
- Network switch to connect the base station to other Ethernet devices (but, configured correctly, the wireless base station can be used in isolation).
And this is the software:
- DOS 6.x installed on all PCs
- Ultimate Doom installed on all PCs (other versions may work but have not been tested)
- Software install CD for Lucent wireless cards
- Kali 1.2 (cracked version by DiNK!)
- Optional: packet driver for whatever Ethernet card(s) you have (Many here, here and here)
- Optional: the mTCP suite of programs (for testing your connection)
Tech note: Toshiba laptops of this era (and possibly others) have an option in the BIOS to configure the PCMCIA slots as "PCIC" or "16-bit CardBus". Although the CardBus mode supports PC Cards (according to the manual), in my case I had to use the PCIC mode, so be aware that you might have to do something similar.
7. The Wi-Fi Card Driver
Note: To maximise the chances of success here, it would be best to simplify your system as much as is reasonable to eliminate potential problems in advance. The easiest way to do this is to physically remove other devices and disable their drivers by commenting them out in CONFIG.SYS and AUTOEXEC.BAT. You can always add them back in later. Alternatively, if you're using a boot menu, you could add a new section.
Perhaps surprisingly, many Ethernet cards (be they ISA or PCI) don't need a driver loaded in CONFIG.SYS in order to work. This may seem counter-intuitive to those of us that are familiar with the standard headache of installing sound cards and such. A utility can be run to configure the card, but those settings are stored on the card itself. Instead, a driver is loaded from the command line for the network protocol you're going to be using once the PC has booted. We'll come onto that later.
PCMCIA cards, however, do usually need a device driver and the Lucent Orinoco is such a card. There are a number of ways to install this software but first you need to download it from the Proxim website. I used the program 7-Zip to expand the contents of the ISO on a modern computer and then copied the files to floppy disk. Alternatively you may wish to just burn the ISO to a CD (useful if you want to set it up in Windows). The specific files we want are in the path DRIVERS\MS-DOS (or MS_DOS in some versions I've seen). There are 3 folders in here called CAD, ODI and Packet but we don't need the ODI folder for this. Although they're in separate folders on the CD, it doesn't matter where they end up on the target machine. I created a folder called C:\DRIVERS\NET, for example, and put them in there, but you may wish to just copy both folders as they are. You will need:
- WVLANCAD.SYS from the CAD folder
- The contents of the Packet folder
CAD does not stand for Computer Aided Design, which is the first thing my brain thinks of when it sees that acronym. Instead it stands for Card Access Driver. The WVLANCAD.SYS driver needs to be loaded via the CONFIG.SYS file on startup. This can be used in conjunction with something called Card Services for DOS, which are drivers providing support for PCMCIA cards. These drivers might already be installed on your laptop, so check and refer to page 122 of the Orinoco manual if you want to go that route (essentially it means you can use the driver without specifying any settings). Here's an example of how the driver is usually loaded, to be added at the end of CONFIG.SYS:
DEVICE=WVLANCAD.SYS /I=10 /B=1300 /M=E100
- The 'I' parameter specifies the IRQ for the card, much like a sound card or anything else. 10 or 11 are good ones to choose as they are usually available and often the default option for network cards.
- 'B' is the I/O port address in hexadecimal. Again, if you've ever set up a sound card, you probably came across the value 220 as standard for the I/O port (also typed 0220h). There are many possible values for this, but the manual cites 1300 and 340 as possible options, so best to stick to one of these if you're not sure. 300 is also often used for network cards.
- 'M' specifies the start of the upper memory range to be used by the card, also in hex. In most cases, you can use the range I've specified here (E100), but you might need to change this depending on your setup. Remember, all of this is only necessary for wireless cards.


8. Memory Management (Optional)

|
| MSD's main screen |

|
| MSD's memory map page |
- A000 to B7FF
- C800 to EFFF
9. Physical Network Setup (Optional)
10. Wireless Network Setup
I've gone with an original Apple AirPort Base Station (Graphite) for this because I had one back then and I know how it works. It doesn't have a web interface, however, and is a bit more of a pain to configure, so much so that I've written a dedicated article on the subject (not yet available).
Wireless access points can usually be configured in one of two modes: bridge or router. If you are connecting to an existing network, choose bridge. This makes the access point 'transparent' i.e. it just connects clients to your existing network. If you are creating a new network, separate from your existing one, configure it as a router. You can then have it running DHCP and everything else for your new network.
11. The Wireless Packet Driver

|
| Some lines from the PACKET.INI file |


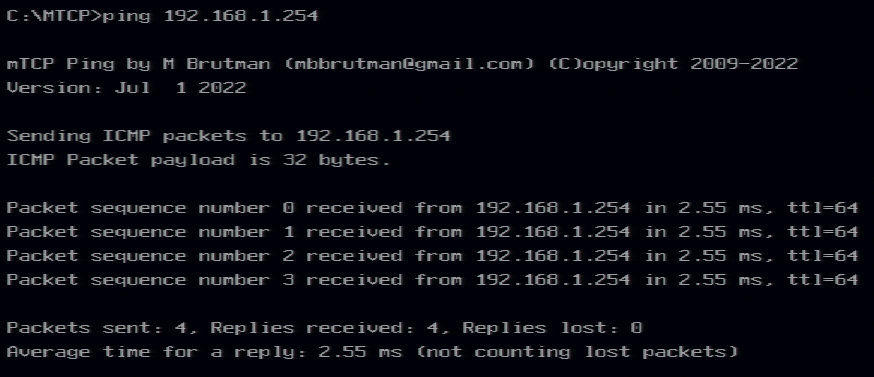
12. Installing mTCP (Optional)
- The PACKETINT setting must match whatever was displayed when the driver loaded in the previous step.
- Because of how the next step works, it's really best that we use a static IP for IPADDR. I like to use numbers higher than 200, because I have this impression (possibly false) that it reduces the likelihood of conflicts. In reality what you want to do is restrict automatic IP allocation to values below 200, and use the >200 range for static allocation.
- The NETMASK is rarely anything other than what's listed above for a home network.
- If your access point is configured as a router, the GATEWAY should match your access point's IP address. If it's setup as a bridge, this should be your main router's address. The IPADDR value should also be in the same subnet, so if the gateway is at 10.0.0.1, then you need an IP like 10.0.0.221, for example.
13. Troubleshooting
